Monday, October 31, 2011

The colors of fall in circles (our circle tree)

I find a lot of sweet memories in the colors of fall. 
I grew up in Michigan and when Autumn time came the trees were painted such brilliant colors. I can still close my eyes and remember driving down dirt roads that were covered with the colors of fall.  I miss the fall time in the North of the U.S.  To me colorful trees are the epitamy of fall.


 I have this thing these days with circles. The kids wanted to make a tree for fall and so we decided to use only things circular in shape.
We have lids, buttons, bottle caps,cork cut into pieces, candy wrappers, and lots of pieces of magazines cut in circles. You could call this our recycled tree.


This was a great project because the kids and I walked around the house trying to find anything that was cylinder or circular.  It is fun to teach the kids to just 'use what we have'. 
I took a piece of card-stock and made circle stencils for the girls.


I have plans to do one more fun thing to that tree..stay tuned.

There are 3 birds hidden in this tree
can you find them?


Happy Fall and Holiday crafting. 

I am thankful for the Master painter, candles, hot drinks, warm and hearty dinners, fun sweaters and scarfs and a cozy home. 

With a smile on my face in my west corner this fall evening,
Becky


I HAVE LEARNED THE SECRET OF BEING CONTENT IN ANY AND EVERY SITUATION, WHETHER WELL FED OR HUNGRY, WHETHER LIVING IN PLENTY OR IN WANT. I CAN DO EVERYTHING THROUGH HIM WHO GIVES ME STRENGTH." PHIL. 4:12,13

Wednesday, October 26, 2011

Drawing courage


"Faith looks back and draws courage, 
Hope looks ahead and keeps desire alive."  The Sacred Romance

Hey just wanted to say I won't be blogging this week other than this post.  Will see you again on Monday.
Taking some time away from the good ole blog and the net.  Good for me every now and again.

~ Enjoy your week.

Drawing courage this week in a God you can create something from nothing,
Becky

Thursday, October 20, 2011

Upcycling for doll clothes~ guest posting

Hi.  Today I am visiting over at 
Creating your way to Success 
just click on the link above and it will take you there.


Stop by and see what the girls and I whipped up for their dolls.
It is a fun post (we think so anyway).

A Sock hoody, Pant leg jean skirts, a Sleeve sweater 
and a Sock dress.

Upcycled doll clothes for our homemade dolls from our mismatched socks an old sweater...

So come on over to Creating your way to Success today and read the rest of the post.
It is a great blog and I am honored to be guest posting for Jill. 


Looking forward to seeing your there. :)  
Also a big Welcome to all of you visiting from over at Creating your way to Success.  Stay awhile and have a virtual tea or coffee. :)
From my little west corner,
Becky

Wednesday, October 19, 2011

Upgraded Journal ~ pieces

Some times writing things out helps to fit the pieces together, weather a song, a poem or just the thoughts of your heart. 


I have been looking for some kind of inexpensive journal or notebook for a gift and I found this rather plain journal for 3.99 liras the other day ($1.75) and bought two. This one I covered with paper pieces and and who knows maybe the other one I will use fabric and make a cover for a Christmas gift. Anyway..  My pics aren't that great especially since I took tons of pics and none turned out oo-la-laish (made up word) but hey maybe it is just the eye of beholder this time that sees all the beauty, and that is ok with me!  


Before:

I enjoyed designing this journal thourghly! I love fitting pieces together to make art. This was my small piece of art for my sweet friend Yonca.  She loves red and black.

After:

I used:
mod-podge and scrap book paper for the front.
The clasp is a: button, ribbon and elastic hair binder


Here are a few back views as well:


Some times writing things out helps to fit the pieces together...

From my corner of the world,
Becky
Linking up to: finger prints on the fridgecreation cornerjoyful stamperFinding Fabulous,
Delicate ConstructionA little TipsyNap Time CraftersSkip to my Lou

I HAVE LEARNED THE SECRET OF BEING CONTENT IN ANY AND EVERY SITUATION, WHETHER WELL FED OR HUNGRY, WHETHER LIVING IN PLENTY OR IN WANT. I CAN DO EVERYTHING THROUGH HIM WHO GIVES ME STRENGTH." PHIL. 4:12,13

Sunday, October 16, 2011

DIY Tissue paper from napkins

This post is super fun for me because it is a perfect 
example of our life and my 'use what you have' theme... We don't have tissue paper here and well I really like all the variety of colors and designs and all the crinkly fun tissue paper gives. A lot of cool crafty ideas from that light weight paper too. Anyway the other day we had been using some orange paint and I had a bit left over I didn't want to waste. So Lydia and I watered down the acrylic orange paint grabbed an eyedropper and went to work.


Who knew what these very pretty napkins were going to be used for but away we went.
We then let them dry over night and when they were finished drying they were a tissue paper texture and kind of crinkly.
We  had a stack of orange napkins hanging out on the counter for a few days.


Here is what we did with our stack of tissue paper like napkins:
Enjoy

We had a little friend over the other day and inspiration hit. I had JUST after almost 7 years in Turkey found clear contact paper.  This truly is a GREAT find for me. Plus it was so inexpensive!!  Anyway here is what we created.  
Anyone living in Turkey this craft is for you. 
Easy around the house items and everything can be found here.  
Happy Fall Crafting.


*I cut a rectangular piece of clear contact paper for each child
*I laid the sticky part up and put rocks on the sides to keep it down. Then the kids took the orange colored cut up napkins and placed them on the sticky part. 
*They then folded the contact paper together and pressed down.
*I cut a circle and they stuck on the eyes and drew the mouth. Ta da easy low expense fun. 


This is what we used:
15 minute craft

Napkins
watered down paint
eye dropper
Contact paper
Black construction paper or foam
tape
permanent marker for mouth

Another fun thing about this craft for us is we don't ever carve pumpkins here. So this was a fun pumpkin face idea.  I think I might do snowmen but just use white napkins. :)  

Tonight I am so grateful for the little things.  I really feel that since I have decided to be content with what God has given me here I enjoy the small finds so much more and I create a lot more and rarely think if only I had....(until I go back to the States and walk into Michael's or Hobby Lobby then when I return back to Turkey it takes me a month or so to be content with what I have. But man I sure enjoy those moments in those stores.) :)

Keeping to my 'use what you have' theme, recently I have noticed how many palettes  there are in my town.  The other day there was a stack outside our neighborhood grocery store. :) Oh hey a project is brewing in my mind. ;) Oh and stay tuned for a few more original fall projects I will post this week.

From my little corner to yours,
In love with my Savior.
Becky


I HAVE LEARNED THE SECRET OF BEING CONTENT IN ANY AND EVERY SITUATION, WHETHER WELL FED OR HUNGRY, WHETHER LIVING IN PLENTY OR IN WANT. I CAN DO EVERYTHING THROUGH HIM WHO GIVES ME STRENGTH." PHIL. 4:12,13

Monday, October 10, 2011

3, 2, 1 ...computer

This is my guest post from over at Delicate Construction last month! Delicate Construction has lots of ideas and Michelle the name behind the blog gave me a fun opportunity to share this post. Enjoy!

Let's zoom into computer time at my house 3 months ago...
everyday these questions were being asked multiple times in my house,"Mom, can I use the computer?"  "Hey mom, can I use the computer now?"  "Mom, is this the day I get to use computer?" In my head I had a plan; the girls could use the computer three times a week for 30 minutes, but the good plan just stayed in my head. I couldn't remember how many times they had been on that week or what time it was when they got on the computer. etc.  Being intentional in my parenting is very important to me but for some reason being intentional with a good 'computer time' plan, I just kept putting off.


That is how 3,2,1...computer was invented. 
I call it colorful responsibility.
I used an:
Envelope
Glue stick
colorful paper 
Scissors &
Numbered stamps


Sooo simple really.  Sometimes as a mom I just need to stop and take the time to consider what it is that is bothering me about a certain situation with my kids. Usually I find if something keeps nagging at me or I am getting continually irritated by it, I should recognize that as my God given mommy insticts and make a plan.


Our Plan:
# Number cards
~3 # cards = 3times a week for the computer
~Every time the girls use the computer they place one of their # cards inside the envelope.
~When there pocket is empty of # cards then there amount of times using the computer for that week is up.

SIMPLE but it gives the girls a sense of ownership and responsibility in keeping track of their computer time and my girls love it~


Pick a Good day to refill pocket
Every Monday  they move the # cards to the front pocket. 
(which is also chore day and allowance day, so it helps them remember)


Place the time in their hands:
A handy dandy timer on the computer desk. 
THEY set the timer at 30 minutes at the beginning of there computer time, when timer dings they are finished.


Colorful Responsibility ...ahh


This has been working great for over 2 months now, good for me and good for kiddos. 
However I need to remember that like in all things with children they will still need that extra help, however giving my kids the tools they need to become responsible with their time will continue to be a valuable lesson as they grow. (and help me too;))

If your found how we managed our computer issue interesting than you might find yourself smiling when you read how we do our chores. :) 

Sometimes in order to get the desired results you just have to mix it up a bit. 
Here is another way we have 'mixed' up chores in our house.  It has been effective for over a year now. 

Click on Cheeky Chores if you're curious. 


I hope these few practical and intentional mothering ideas have been helpful. They have truly been helpful for us. Thank you so much for letting me share a look into our lives.  Enjoy being a mommy and loving on your kids.

Michelle thank you for letting me come and camp out over at your blog for the day and for having a great blog with such a variety of original ideas.  Much care from my corner of Turkey to your sweet corners.

Remember to smile at your kids today. :)
~Becky

Friday, October 7, 2011

Public KITCHEN Library

Come one and all to the opening of our
Public Kitchen Library.

f
Welcome to our public kitchen Library.
Our motto: For the love of books.
Bonuses:
cute Librarians
cool stamp pad
homemade library cards
quality books
food near, in case of hunger 

What we did:
We taped small white pieces of paper to the front of the books
We used some make shift stamps and a stamp pad. One stamp to check out the book /one stamp for when it was checked back in.

The girls favorite part of course was all that stamping and feeling so official.
They also liked typing in the Library card # . :)

bonus: Simple set up and quick tear down:
We grabbed 3 boxes 
white paper
tape
stamp pad
2 stamps
books
 Took us 20 minutes to put together and 10 or less to take down. :)


Here in Turkey there are few Libraries and the ones that are here are not necessarily public libraries. Lets just say there is no fun childs section.  I miss Libraries in the States and am amazed at what a wealth of resource a Library can be and how it is full of exciting books and gives an awe and wonder for reading to young and old.
Every time we go back to the States we load up our suitcases with 2nd hand books kids books. 
Truth is we really do have our own small library with the amount of books we cart here from the States. 

We made our own Pretend Library and had a blast.  I was the librarian for a few minutes too. Yes, I too liked the stamping check out part. ;)
Ps. we did this on a hot August day thus the missing shirt from my daughter. :)

Pss. If you enjoy pretend play you might also really enjoy: our Home Theater post. :)

For the love of the written word ~ 
Becky

I HAVE LEARNED THE SECRET OF BEING CONTENT IN ANY AND EVERY SITUATION, WHETHER WELL FED OR HUNGRY, WHETHER LIVING IN PLENTY OR IN WANT. I CAN DO EVERYTHING THROUGH HIM WHO GIVES ME STRENGTH." PHIL. 4:12,13

Linking up: Skip to my LouMaking the world cuter,Keeping it Simple,Sew can do

Tuesday, October 4, 2011

Homemade name puzzle and frame


Here is my Guest post from over at SUN SCHOLARS.  Sun Scholars is such a fun blog for moms with young kids. Rachel has GREAT ideas and is featured all over bloggy land. I love her Sharpie tie-dying and her activity tray ideas I felt honored to be guest posting for her. If you have never visited her blog and you have youngsters I suggest you do. :)


My two older girls attend the Turkish schools here during the school year. So Summer time is our time to work on English, unless of course we want our children reading & writing like Tarzan, summer school is a must.(no offense Tarzan) I am always trying to find ways that work for each of my girls learning styles.  


One of my girls is very visual and the other kinestatic (shes a mover). So I went to work at creating a puzzle that could help them learn. The Turkish language is very phonetical and so my oldest daughter struggles with spelling in English...especially our last name. :) Schneider. Thus the last name puzzle was born:


How I made our 
Homemade 'last name' puzzle:

I prepared the letters on construction paper and used
a large piece of card stock to start off the process.


Also Mod Podge is not available here (someone gave this to me, lucky me!!).
Before mod podge arrived at my house
I would make
 home made mod podge:
 using white glue and water to water it down a bit.


I glued each letter to the construction paper 
I had cut and prepared.


After cutting the card stock to a size I liked,
it was time for some mod podging .


I applied the first coat and let it dry and then applied the second coat.

Again I cut the card stock to size.


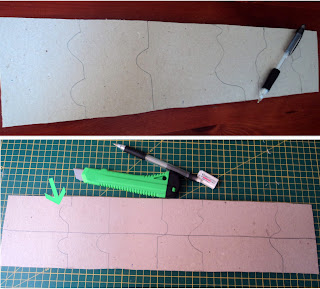
I free handed the puzzle pieces on the back. 
I started with large pieces and then drew a line 
down the middle to create smaller pieces.

The mistakes I made on this first puzzle is that not all the pieces were nobs. 
(the green arrow above points to what I mean by nob) As I do it again I will do it all this way.


I cut the pieces with an X-acto knife into 
the random pieces on my cutting mat.

Tada, Tadum delightful puzzle pieces. 
I could stop here. However I wanted a frame for the puzzle.

Follow on down to view the
 2nd part of this tutorial.
Homemade puzzle Frame:

*For the frame I used a piece of sturdy cardboard that
I have from one of the cardboard boxes I am hording collecting.

*I measured the size of my 'lastname' puzzle and marked accordingly on my cardboard frame to be. 
I then used my X-Acto knife and cut out the center.

*I glue gunned a piece of card stock for the backing. 

I did try my puzzle pieces several times to assure
they would fit properly and without bulging.


Something I added at the last minute was to add some color 
to the inside of the frame (the backing) where the pieces fit.

I color coded them.  
You will see the example of this if you scroll down to the finished product.


The above and following pictures are the fun part; 
making it visually fun. 

The above and following pictures are the fun part; 
making it visually fun. 
I am a dot lover. 


 After I decorated it, 
I then put modge podge on it one more time for a shine.  

Here is the end result. 
Pure visual, manipulative learning fun.


Ok ~ so you can tell it's the one that looks homemade among our puzzle stash.  However, I am willing to bet this one wins out on the amount of love given when being made. ;) Plus I think homemade is super cool.

*I am also in the process of creating a few more puzzles to fit into this same diy frame:
phone number, address etc.

Thanks for allowing me to share a bit of our cultural life and learning with you all.  
Much care from our little corner of Turkey.
Again check out Sun Scholars and expect some fun stuff for kids.

From my corner ~ using what I have to create.
Becky

"I HAVE LEARNED THE SECRET OF BEING CONTENT IN ANY AND EVERY SITUATION, WHETHER WELL FED OR HUNGRY, WHETHER LIVING IN PLENTY OR IN WANT. I CAN DO EVERYTHING THROUGH HIM WHO GIVES ME STRENGTH." PHIL. 4:12,13

Sunday, October 2, 2011

Autumn means cozy Homemade Granola

Temperture is dropping and sunsets are coming earlier. 
Autumn has come and with it so many fun smells, colors and tastes. 
One thing I especially enjoy about fall time is warming up the kitchen in the morning and making it all cozy. Granola is one easy and yummy way to do that.

Our Stove-top Granola:
This takes me a total of 35 to 40 minutes to prepare/cook/serve

* 4 cups of Oatmeal
*1 tbs oil
stir together in a large skillet (frying pan) on med. heat for 4 to 5 minutes
Take oatmeal out of skillet and place in seperate bowl.
(Turn your oven ON low/med)

Add 
*2 Tbs. butter
*1/4 cup brown sugar
*3 Tbs. honey to skillet
mix together
Allow mixture to become bubbly
add 1 tsp. vannila or almond extract to the bubbly mixture depending on flavor desired
Next return oatmeal to mixture and stir until oatmeal is somewhat moist.
Cook on med heat for 10 minutes. The oatmeal will darken and become brownish. Stir occasionally.

Turn OFF oven

Put granola on cookie sheet and place in warm oven for 5 to 10 minutes. 
Oven should be off - I do not mix or stir. 
Remove granola from oven and
add nuts and dried fruit as desired.
Let cool for 15 minutes and serve.

Find yourself a bowl and serve it up. 
I love these fun colorful bowls.
Cozy moments.

In my cozy west corner being my cozy queen self. :)
Becky


"I HAVE LEARNED THE SECRET OF BEING CONTENT IN ANY AND EVERY SITUATION, WHETHER WELL FED OR HUNGRY, WHETHER LIVING IN PLENTY OR IN WANT. I CAN DO EVERYTHING THROUGH HIM WHO GIVES ME STRENGTH." PHIL. 4:12,13

Linking up to these parties: Making the world cuter,Skip to my lou
Related Posts Plugin for WordPress, Blogger...

LinkWithin

Related Posts Plugin for WordPress, Blogger...