
Last Christmas ( yes, I know I have a story for everything) we decided to have a ‘homemade Christmas’. We didn’t buy presents for the kids and wanted to try and 'use what we had' around the house and we made their gifts ourselves. I have posted about the quilted pillows and the race car track but I just have not gotten around to the scrap wood dollhouse we made for our two little girls. We had made the fun cardboard dollhouses (that are still around) and wanted to give their Polly’s their own permanent residence.


Here are a few before and after pics. I have completed the kitchen and living room and am working on the loft/party room.


 |
| Scroll down for before and after pics! |
Last Christmas ( yes, I know I have a story for everything) we decided to have a ‘homemade Christmas’. We didn’t buy presents for the kids and wanted to try and 'use what we had' around the house and we made their gifts ourselves. I have posted about the quilted pillows and the race car track but I just have not gotten around to the scrap wood dollhouse we made for our two little girls. We had made the fun cardboard dollhouses (that are still around) and wanted to give their Polly’s their own permanent residence.
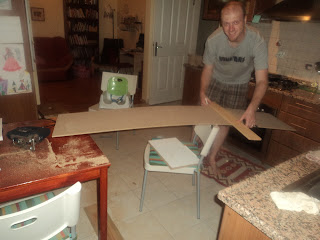
We wanted to ‘use what we had’ and truth is there is no DIY Stores here so we used the scrap wood we had from an old dresser. As you will see constructing the DIY dollhouse in an apartment can be rather messy for my kitchen. J
The following is our collection of scrap wood.
And here is what we did with it....


We barely finished the dollhouse for Christmas morning in time and I had NO time to decorate it so we gave it as is:


However the girls were delighted and have played with it faithfully on and off over the year despite it’s lack of decor.
Well renovations have begun on our Scrap wood dollhouse and inspiration has been my friend.
I hope you enjoy!
 |
| Here is the kitchen. My favorite piece is the little bottel caps with a piece of fabric in the middle. :) |
 |
| I made my own little shelf with cardboard and hot glued it together and then hot glued it to the wall. I would still like to paint the little tea table and dinning room table but I am not sure what color?? White, any thoughts? |


 |
| The dinning room was alot of fun! The wall paper is fabric pieces ~ I love the patchwork look and the girls think it is great. I used the cornstarch mixture from this post to paste it to the wall. I am sure I will do this again on one of the other rooms. My girls favorite piece in the living room is the little tack hooks I made. :) (I made the littte ottomon on the left out of cardboard and fabric with some stuffing. The coffee table is made out of 3 ribbon spools. ) I have this thing about homemade dollhouses. They have a way of growing with your girl and everytime they get a new piece of furniture or a new teapot their love for their dollhouse starts all over again. Also when the kids get to help, paint, decorate and create it gives them so much ownership to their wonderful creation that provides HOURS of fun and imagination and helps keep the little girl in my little girls. :) Plus doing it together keeps me close to them. :) ~Becky |
7 comments:
I love this! Want to come to Denmark and decorate for me? I could definitely use a thumbtack coat rack too!
Neeto!
Wow! This is amazing. I love all of the little creative details you are putting into each room. How totally fun this would be to do together with kids! Like interior decorating on a mini scale. Now...I just need to find myself an old dresser... :)
Brilliant dolls house! We've got one we scored at a garage sale - and the girls and I had so much fun decorating it!
Yours looks fabulous! Love the wall art too!
Thanks for linking to a Round Tuit!
Hope you have a great weekend!
Jill @ Creating my way to Success
http://www.jembellish.blogspot.com/
So fun to read about your doll house. I am smiling as I imagine Autumn and Lydia having so much fun with this!!!
How much fun is this for you and your kids!
I think it is great that it all happens piece by piece, and as you say, makes it more enjoyable for them.
You did a fabulous job with the doll's house!
Oh my goodness, how creative & adorable. I bet your kids have enjoyed it so much. Thanks for linking it up!
Warmly, Michelle
Post a Comment