Here is my Guest post from over at SUN SCHOLARS. Sun Scholars is such a fun blog for moms with young kids. Rachel has GREAT ideas and is featured all over bloggy land. I love her Sharpie tie-dying and her activity tray ideas I felt honored to be guest posting for her. If you have never visited her blog and you have youngsters I suggest you do. :)
My two older girls attend the Turkish schools here during the school year. So Summer time is our time to work on English, unless of course we want our children reading & writing like Tarzan, summer school is a must.(no offense Tarzan) I am always trying to find ways that work for each of my girls learning styles.
One of my girls is very visual and the other kinestatic (shes a mover). So I went to work at creating a puzzle that could help them learn. The Turkish language is very phonetical and so my oldest daughter struggles with spelling in English...especially our last name. :) Schneider. Thus the last name puzzle was born:
How I made our
Homemade 'last name' puzzle:
I prepared the letters on construction paper and used
a large piece of card stock to start off the process.
Also Mod Podge is not available here (someone gave this to me, lucky me!!).
Before mod podge arrived at my house
I would make home made mod podge:
using white glue and water to water it down a bit.
I glued each letter to the construction paper
I had cut and prepared.
 |
After cutting the card stock to a size I liked, it was time for some mod podging . I applied the first coat and let it dry and then applied the second coat. |
Again I cut the card stock to size.
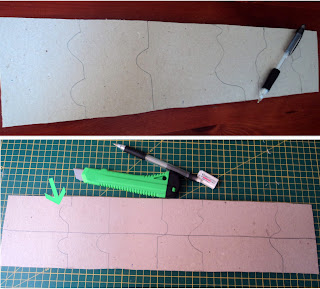
I free handed the puzzle pieces on the back.
I started with large pieces and then drew a line
down the middle to create smaller pieces.
The mistakes I made on this first puzzle is that not all the pieces were nobs.
(the green arrow above points to what I mean by nob) As I do it again I will do it all this way.
I cut the pieces with an X-acto knife into
the random pieces on my cutting mat.
Tada, Tadum delightful puzzle pieces.
I could stop here. However I wanted a frame for the puzzle.
Follow on down to view the
2nd part of this tutorial.
Homemade puzzle Frame:
*For the frame I used a piece of sturdy cardboard that
I have from one of the cardboard boxes I am hording collecting.
*I measured the size of my 'lastname' puzzle and marked accordingly on my cardboard frame to be.
I then used my X-Acto knife and cut out the center.
*I glue gunned a piece of card stock for the backing.
I did try my puzzle pieces several times to assure
they would fit properly and without bulging.
Something I added at the last minute was to add some color
to the inside of the frame (the backing) where the pieces fit.
I color coded them.
You will see the example of this if you scroll down to the finished product.
The above and following pictures are the fun part;
making it visually fun.
 |
The above and following pictures are the fun part; making it visually fun. |
I am a dot lover.
After I decorated it,
I then put modge podge on it one more time for a shine.
Here is the end result.
Pure visual, manipulative learning fun.
Ok ~ so you can tell it's the one that looks homemade among our puzzle stash. However, I am willing to bet this one wins out on the amount of love given when being made. ;) Plus I think homemade is super cool.
*I am also in the process of creating a few more puzzles to fit into this same diy frame:
phone number, address etc.
Thanks for allowing me to share a bit of our cultural life and learning with you all.
Much care from our little corner of Turkey.
Again check out Sun Scholars and expect some fun stuff for kids.
From my corner ~ using what I have to create.
Becky
"I HAVE LEARNED THE SECRET OF BEING CONTENT IN ANY AND EVERY SITUATION, WHETHER WELL FED OR HUNGRY, WHETHER LIVING IN PLENTY OR IN WANT. I CAN DO EVERYTHING THROUGH HIM WHO GIVES ME STRENGTH." PHIL. 4:12,13


2 comments:
We took the summer off this year and went home to Norway for a whole two months. Finally got Isabel the 7 year old to speak Norwegian again, although she doesn't now that we are back in the US again.
The school system in Norway actually offers free internet school to Norwegian kids living abroad. They have to take three subjects, Norwegian, Religious studies and Social studies. Every week a teacher will send us a homework assignment that we do online and send back. They grade it and give the kids feedback on it.
It takes us about 30 minutes a day to do a little bit of homework on top of the homework she gets from her public school here, but it will be nice next year when we move back to Norway and she can get it all at the public school there.
Really love the puzzle idea though.
Marianne, I sure know what it is to have a child forget a language. It is true though it will come back when they are immersed in it again. I am sure it was so nice to have a program that was already available to suit your needs for your daughter that is SUPER great. ~ I love hearing from other moms living abroad in countries that are not their native. Thank you for stopping in. :)
Post a Comment